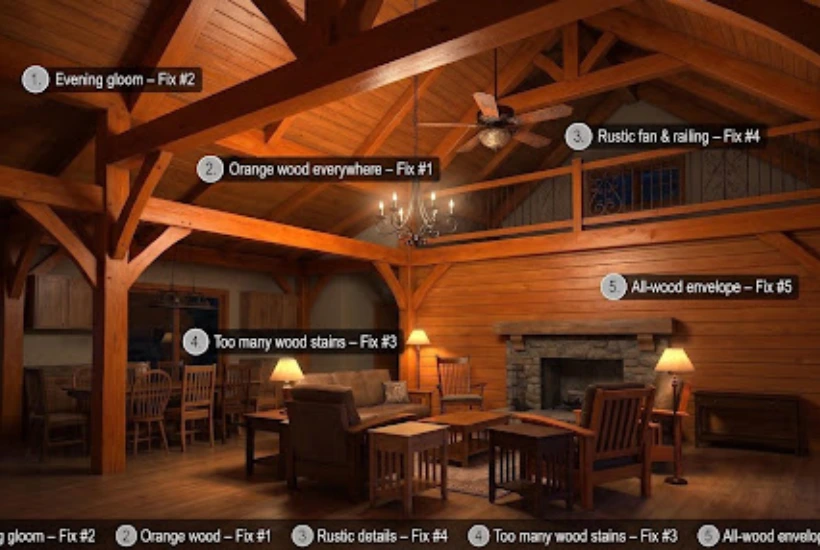
Timber everywhere can turn an airy room into a lodge. The cure isn’t ripping out beams, it’s quieting the surfaces that compete with them.
Over the next few minutes, you’ll see five ranked moves: 1) set a clear wood hierarchy; 2) cross-light the beams with layered LEDs; 3) pare back and soften furniture; 4) replace dated rustic details; and 5) add one bold non-wood plane. Each tactic comes with U.S. cost ranges, DIY-versus-pro notes, and reversibility tips.
Safety first: before you drill, wire, or cover anything, confirm each beam’s structural role with a timber-frame pro.
Quick room check: why does it feel off?
Stand in the middle of the room for one focused minute and ask, What’s weighing the space down right now? Look for these tell-tales:
- Evening gloom? Your beams and ceiling absorb light instead of reflecting it; see Fix #2.
- Everything looks amber or orange? Warm bulbs or an aging finish exaggerate the wood’s color; Fix #1 can help.
- Fresh paint still reads rustic? A busy ceiling fan, ornate railing, or oil-rubbed-bronze handle fights your new walls; jump to Fix #4.
- The room just feels busy? Count the wood stains without turning your head; more than three signals visual clutter. Fix #3 trims the noise.
- Still feels like a timber monolith? One confident non-wood surface adds the contrast you need; Fix #5 shows how.
Write down the line that fits your room. Start with the matching fix, not the latest Instagram trend, and you’ll see progress faster than a fresh coat of paint.
1. Keep the frame; quiet the background with a wood hierarchy
Best for: rooms where every surface is wood on wood
Cost range: about $150-$800 DIY, $1,500-$6,000+ with a pro
DIY friendly? Yes, up to the stain/clear-coat stage
Reversibility: medium, because most finishes can be stripped or repainted
Safety check: Before you sand, drill, or run wiring, confirm each beam’s structural role with a timber-frame pro. Structural timbers move with humidity and often carry loads the ceiling boards do not.
Spot the three levels of wood
Picture the room as a play. Chunky posts and trusses are the lead actors, ceiling boards and floors are the supporting cast, and furniture or picture frames are the extras milling about.
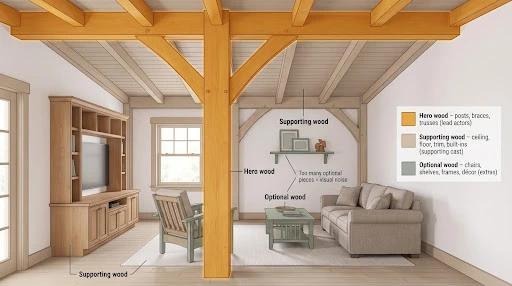
- Hero wood: posts, braces, and trusses that shape the architecture. Keep these fully visible.
- Supporting wood: ceiling decking, floors, window trim, built-ins. Let them share the hero’s palette or drop into a lower-contrast tone.
- Optional wood: chairs, shelves, frames, décor. Limit this group to one or two matching pieces; everything else can shift to paint, upholstery, metal, or glass.
Quick metric: if you can count more than three different stain colors in the optional group, visual noise is creeping in.
Write each surface into its bucket. Once the extras quiet down, every later choice (lighting, paint, even hardware) gets simpler, and the frame keeps center stage.
Diagnose the finish, not the wood
An orange ceiling usually isn’t “old pine.” It is a glossy, ambering top coat. Oil-based varnishes warm timber on day one and grow yellower every year. Water-based satin finishes stay lighter and more neutral over time.
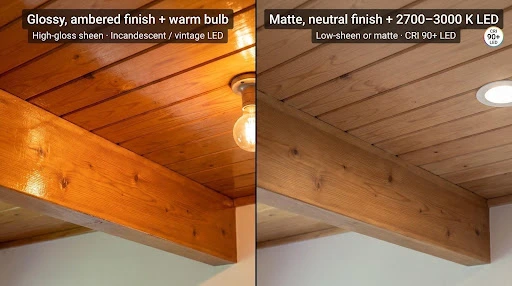
Run this three-step check:
- Sheen. Aim a flashlight at the ceiling. A mirror-like reflection signals a high-gloss film that traps light near the rafters. Low-sheen or matte coatings scatter light, show grain, and tone down that pumpkin cast.
- Uniformity. If beams and boards share the exact color, the ceiling reads as one heavy slab. Lighten the decking or slightly darken the beams to add depth.
- Lamp color. Incandescent bulbs and “vintage” LEDs skew warm. Switch to LEDs labeled 2700-3000K and CRI 90+; a CRI of 90 or higher is generally regarded as excellent color fidelity.
Many homeowners get most of the improvement just by dropping the gloss and swapping bulbs. No ladder gymnastics required.
Pick the least-to-most-invasive route
Work from light touch to full repaint so you can stop the moment the room feels balanced.
- Clean and relamp. A microfiber wipe and a swap to 2700K, CRI 90+ LEDs often shave a full paint-chip step off an orange ceiling for less than $50 in bulbs.
- Drop the sheen. One coat of a water-based matte clear finish (about $40 per quart, covering roughly 100 sq ft) knocks down glare without masking grain. Test a single panel before committing.
- Add a translucent wash. A mist-gray or pickling stain mutes warm tones; two light coats on scrap wood reveal how evening light will read the color.
- Paint between the beams. Leave the timbers natural while coating the tongue-and-groove or drywall a warm white. The contrast visually lifts the ceiling.
- Paint beams only as a last resort. Reserve this for faux or badly mismatched beams, and confirm they are non-structural before you open the primer.
For room-by-room ideas, Hamill Creek Timber Homes’ decorating ideas for your timber frame home shows how lighting, rugs, neutral colors, and natural textures let the frame stay in charge.
Modern wall and ceiling colors that play nicely
A warm white with a high light-reflective value (LRV 78-85) such as Sherwin-Williams Alabaster (LRV 82) keeps vaulted rooms bright, but you have range:
- Mushroom or putty (LRV 55-65) adds depth without stealing the beam’s spotlight.
- Soft clay or khaki (LRV 45-55) warms up north-facing rooms that feel cool.
- Muted green-gray (LRV 50-60) brings a biophilic note that pairs well with matte black hardware.
- Controlled charcoal accents (LRV 20-25) ground a single feature wall or built-in and make honey pine feel intentional.
Always brush a test square right next to the timber and view it under daytime sun and your evening 2700K LEDs. Undertones that read calm at noon can skew green or peach after dusk.
Common pitfalls to dodge
- High-gloss topcoats (gloss ≥ 70 on a 0-100 scale) spotlight every joint and yellow fastest; choose satin or matte instead.
- One-to-one stain matching. Cabinets that copy every rafter make the room feel busy; vary tone or switch to paint.
- Unapproved wiring runs. Never drill or chase cables through a load-bearing beam without a timber-frame pro or electrician signing off. Structural voids can weaken the member and violate code.
- Phone-screen color picks. Pour a 2-ounce sample pot on scrap, view it for 24 hours under daylight and your 2700K LEDs. Digital previews hide undertones.
Pause after each change. If the space already feels balanced, call it done. The frame has reclaimed the spotlight, which is the goal.
2. Cross-light the beams with layered LED lighting
Best for: rooms that feel dim after sunset or rely on a single wagon-wheel chandelier
Cost range: $300-$2,500+ (fixtures and basic wiring)
DIY friendly? Fixtures often; hire an electrician for new circuits
Reversibility: high for fixtures, low after new wiring goes inside walls
Great timber ceilings look dramatic at noon yet disappear after dark. The fix is cross-lighting: aim adjustable LEDs from opposite walls so light grazes the beams instead of dropping straight down. Grazing light reveals grain and depth in a way a single downlight cannot.
Start with three simple layers
Every effective lighting plan combines ambient, task, and accent light.
- Ambient fills the volume so you can move without squinting.
- Task targets work zones such as chopping veggies, reading, or dealing a hand of cards.
- Accent skims the timber, revealing grain and joinery after dark.
Many timber homes still rely on one wagon-wheel chandelier for all three jobs. The down-light leaves beam bays in shadow and throws glare at eye level: bright table, gloomy rafters.
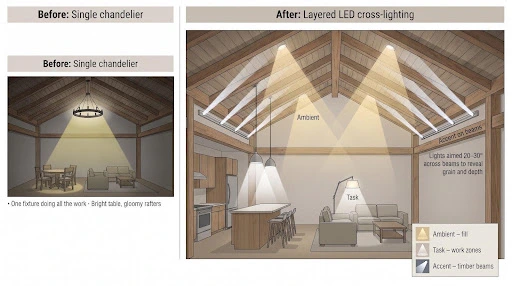
Swap that lone fixture for two adjustable LED tracks aimed across the ceiling from opposite walls. Cross-lighting grazes the beam faces at about a 20-30-degree angle, revealing depth the way late-afternoon sun does. This tactic reveals more of the timber than any pendant while keeping the room bright.
Hold that picture; next we fine-tune specs, color temperature, and smart scenes.
Dial in the specs: color, CRI, and beam spread
Timber glows when your lamps hit three numbers:
- Color temperature: 2700-3000K. This warm range flatters wood without the yellow cast of vintage bulbs.
- Color-rendering index (CRI): 90+. High CRI keeps grain crisp and paint swatches honest.
- Beam angle matched to height. Aim narrow 15-25° optics at ridges higher than 18 ft; use 30-40° lenses for lower ceilings or wall art.
Make every lamp LED. The U.S. Department of Energy notes today’s LEDs can use up to 90 percent less energy and last roughly 25 times longer than comparable incandescents. That payback matters when bulb changes require scaffolding.
Manufacturers list beam angle and CRI on the spec sheet or package. Lock in 2700K, 90 CRI, and the right optic, and you have a pro-level lighting plan without a designer fee.
Add smart scenes that shift with your day
Good lighting is about timing as much as lumens. A single smart keypad can store four everyday presets:
- Daytime: most fixtures off, cross-lights dim, daylight rules.
- Cooking: task spots 100 percent, track at 50 percent, pendants sparkling over the island.
- Entertaining: ambient at 70 percent, beam grazers up to spotlight joinery.
- Nightcap: wall washers at 15 percent, floor paths glowing for safe footing.
The 2025 AIA Home Design Trends Survey again ranks low-maintenance materials and smart thermostats as the two most popular product features, proof that tech-assisted comfort is now mainstream.
Choose controls rated for LED loads and, when possible, with a neutral wire to prevent flicker. If wiring already sits behind timber, a battery keypad paired with smart bulbs can bridge the gap until the next remodel.
Set each scene once, then enjoy lighting that adapts at a tap while the beams stay center stage.
3. Edit the furniture: fewer, larger, softer pieces
Picture a gallery where every painting shouts. That is what happens when a timber room packs in five wood stains, a tangle of chairs, and piles of pillows. Your eye never settles long enough to enjoy the frame overhead.
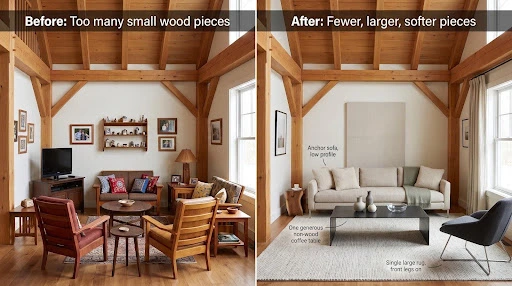
Flip that script and keep only a few pieces, each one calmer and larger.
Start with an anchor sofa. Choose a low-profile upholstered model about two-thirds the width of the wall it faces; it lets beams hover above. Slim metal or stone legs keep the seat looking light.
Add one generous coffee table. A 48- to 54-inch glass or blackened-steel top echoes modern restraint and prevents the wood count from climbing.
Ground the setting with a single rug at least 8 × 10 feet. Place the front legs of every main seat on the pile. Large wool or flat-weave textiles absorb echo in vaulted ceilings, and AIA surveys note growing homeowner interest in acoustic comfort.
Layer texture, not more timber. Linen drapes, bouclé cushions, or a felt wall panel soften sound and add color. Stick to two main fabric tones such as oat and charcoal, and let one accent hue appear sparingly in art or a throw.
Edit ruthlessly. Keep one live-edge piece if it tells your story, and swap the rest for matte ceramic, glass, or framed prints. Once the supporting cast quiets, your beams reclaim center stage and the whole room breathes again.
4. Swap the rustic clues: fans, railings, hardware, controls
A single outdated ceiling fan can undo all your finish work. Wagon-wheel chandeliers, scrolled railings, and rows of oil-rubbed-bronze pulls whisper “mountain lodge,” even after fresh paint.
Start with a detective sweep. Snap photos of the ceiling plane, handrail line, and eye-level hardware. Tag anything ornate, bulky, faux aged, or bright white against dark timber. Think antler lights, heavy Tuscan handles, busy balusters, and toggle switches.
Next, choose one modern material language and apply it everywhere you touch. Slim blackened steel is an easy win: a 52-inch three-blade fan, pencil-thin balusters, flat cabinet pulls, and a low-profile keypad can all share that finish. Consistency makes every holdover obvious and quick to replace.
Black too bold? Try brushed stainless with mushroom paint, or charcoal hardware against muted green cabinets. The rule is unity, not any single color.
Add smart controls for the final polish. One keypad can store fan speed, lighting scenes, and shade presets. The 2025 AIA Home Design Trends Survey lists smart thermostats among the most requested products, showing that tech comfort is mainstream.
Structure before style: decorative strap plates can turn black in an afternoon, but a load-bearing steel connector stays per the engineer. Mask it instead of painting it.
Step back. With the visual chatter gone, the beams headline the show and the supporting cast finally looks ready for a modern audience.
5. Introduce one bold non-wood plane
If the room still feels like a wall-to-wall timber blanket, add a single surface that is decidedly not wood. One large plane such as plaster white, polished concrete gray, honed stone black, or ultra-matte cabinet green gives the eye a place to rest and lets the beams read as accents again.
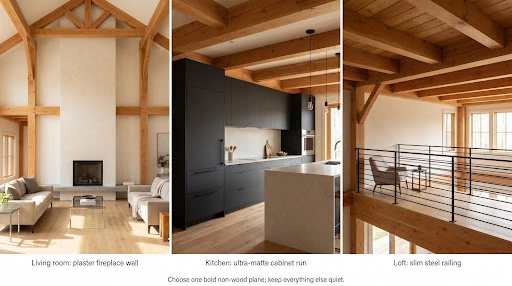
Choose the surface with the greatest impact:
- Living room: the fireplace wall or chimney chase
- Kitchen: the full cabinet bank or island face
- Loft: a slim black steel or frameless glass railing
Keep the material count tight: one bold statement, and let everything else stay quiet. Pairing a plaster chimney with a concrete floor and exposed steel adds too many voices at once.
Rough U.S. cost guide
Figures are typical contractor ranges; get local quotes.
- Lime plaster over existing drywall: $8-$14 / sq ft, typically $2,500-$4,000 for a standard fireplace wall
- Ultra-matte FENIX NTM cabinet refacing: $95-$140 / sq ft of door or drawer face, and a full 12-ft run can top $10,000
- Custom blackened steel railing: $120-$180 / linear ft installed, depending on spans and site welding
FENIX NTM, the ultra-matte, anti-fingerprint surface made by Arpa Industriale, is a common choice for low-glare cabinet fronts. It offers an easy way to cut visual shine without adding more wood.
Conclusion
No matter which surface you pick, you are balancing the frame, not hiding it. One confident plane makes the timber special again precisely because it no longer blankets every inch in sight.
Related posts:
How a Debt Relief Program Can Help Families Finally Afford Their Dream Space
18+ Mexican Fiesta Decor Ideas To Spice Up Your Party
Easy Home Organisation Projects That Make Everyday Life Simpler
How to Make a Bathroom Safer for Seniors or Kids
23 Best Christmas DIY Candles for
How to Choose a Reliable Bed Frame Brand for Contemporary Spaces

- How to Design a Timber Frame Interior That Feels Modern: 5 Fixes for Too Much Wood - September 17, 2026
- The Best Omegle Alternatives in 2026 - September 15, 2026
- A Practical Indoor Air Quality Checklist for Every Season - September 15, 2026

Leave a Reply